Thursday, December 29, 2011

Dessert - Homemade DQ Blizzard Machine Refills and that thing with Snoopy


Ice cream mix for the Dairy Queen Blizzard Maker


3/4 c. 1/2 and 1/2
2 tablespoons of sugar (or 1 Tablespoon of splenda)
1/2 t. vanilla
dash of salt

Follow directions on the Blizzard maker for making soft serve ice cream

A few Christmas's ago there was an ugly incident with a snoopy snow cone maker (more on that later). So when the dq blizzard machine showed up under the tree (a gift for the kids from my sister) I vowed to stay far away. The first few days of blizzard making went just fine and the kids had a good time. This afternoon I returned to Walmart to buy more of the little packets of ice cream mix and Walmart was all out.
Normally this would not be a big deal. But I am the mother of 3 young sons. I have sent the better part of the last week cooped up in a house full of visiting relatives, Christmas toys, dirty dishes and too many people asking me too many questions - often all at the same time. I promised the kids that if they would quit fighting over bay blades they could have ice cream.  Now the damned Walmart was out of mix and I was this close to a nervous breakdown.

"Don't worry" i told the boys "mommy knows how to make blizzards!" In my dream scenario this is where they cheer and declare me the best mommy ever. In real life they gave me the side eye and mumbled something out "wanting real blizzards and the fire bey blade."

Back at home I sent them out of the kitchen and threw open the cabinets. "No, sweet heart, you cannot help. Please go play." Mommy needed a moment to figure out a recipe and possibly pop a zanax.

I assembled the blizzard machine and began making ice cream. Turns out I had the machine put together incorrectly and all of the mix ran out onto the counter. On my second try I got it right and had yummy ice cream in about 5 minutes.

This time they did cheer and declared me the best mommy ever! [fade out on me wearing a crown and sash as I wave to the crowd]

In other mommy adventures:


The Snoopy Snow cone debacle

The holidays are always a stressful time in our house. There's just too much everything. Too much food, too many people, dirty dishes and way too much noise.  I do best with a schedule and some kind of order. Holiday time in our home is the extreme opposite of that. The stress sometimes leads to odd behavior on my part (don't judge me).

So a few years ago Santa brought the kids a snoopy snow cone maker for Christmas. I make the syrup on the stove (sugar, water and 1 kool aid packet) and let it cool. Once cooled i poured it into the the little syrup dispenser.

Next we gathered ice cubes and began grinding them according to package directions. Before too long the kids were enjoying yummy snow cones.

I too tried a snow cone and found them to be delicious. I finished my first thimble sized snow cone and wanted another.

Maybe it was the icey deliciousness, maybe it was the stress of the holidays but for some reason I could not get enough of these tiny snow cones. Later, after the kids went to bed I found myself up in the middle of the night grinding ice cubes like a fiend and eating snow cones by the vat.

By morning the handle was broken off the snow cones maker, the syrup was gone and there I stood with a red mustache and all lying to the kids: "no kids, I have NO IDEA what happened to Snoopy...red tongue, my tongue is always red, what are you walking about, it wasn't me!" There was no 2 ways about it my I had been caught red mouthed having devoured the kids goodies and broken the children's new Christmas toy. The shame of it all.

But mommy's are magic.  Later that day we marched right down to target and got an electric ice shaver and a dozen kool aid packets. Voila-all better.

We still eat too many icees, they are just so delicious. Only now its guilt free. they younger kids are too young to remember the unfortunate icee incident and the older kids have forgotten (I hope).

Icee Syrup

1 packet of unsweetened powdered drink mix and flavor (I like kool-aid tropical punch)
1/2 c. water
1 c. sugar

Mix everything over medium heat. Stir constantly until sugar is melted and water just begins to boil.

Remove from heat and cool.

Spoon or pour over shaved ice.

Thursday, December 8, 2011

Baking - Honey Oat Pizza Crust


I've made it my life's work to sneak in whole grains to my family's diet.  Sometimes I'm successful, sometimes not.

Last night I found yet another new way to slip in some grains.  They never noticed the difference and the result was DELICIOUS!

I changed up an old recipe and made:

Homemade Pizza with Honey Oat Crust


Preheat oven to 400 degrees with your pizza pans inside.

Honey Oat Pizza Crust

2 cups all purpose flour
1/2 c. quick cook oats
1 Tablespoon (1 envelope) quick rise dry yeast
1 teaspoons salt
1 c. warm (not hot) water
2 Tablespoons olive oil
1 Tablespoon honey

In a large bowl I mixed the flour, oats, salt and yeast. In large cup I mixed the warm water, oil, honey.

Make a well in the middle of the flour mixture. Pour in the water mixture. Slowly combine the wet with the dry until it all comes together. The mixture will be a little wet and a little lumpy. Set it aside for about 10 minutes to rest.

While the dough rests, make or gather everything else you'll need.
You can always use jar sauce, but here's the recipe I use.

Pizza Sauce

1 6oz. can tomato paste
1 small onion diced
1 small carrot shredded
2 Tablespoons olive oil
Water
salt, pepper, garlic, basil, oregano, fennel seed to taste.

Saute the carrots and onion in the oil until soft. Add tomato paste and water. Use enough water to make the sauce as thick or thin as you like it. Add seasonings to taste.

Making Pizza
Allow the sauce to simmer while you roll out the dough.
On a well floured board, knead the pizza dough until it is smooth and elastic. Divide the dough in 2.
Knead and roll out the first dough ball into a pizza crust. Place the rolled crust onto a lightly oiled warm pizza pan.
Bake until golden brown. Repeat with the second dough ball.

Once the crusts are ready, remove them from the oven. Turn the oven to broil.

I like a crispy crust, so I flip the crust over so that the brown side is down against the pizza pan. Cover the crust with pizza sauce, toppings and the shredded cheese of your choice.

Broil the pizza until golden brown. Remember to watch the broiling pizza VERY CLOSELY. It can burn quickly!

This method of pizza making will give you a pizza with a brick oven taste. A word of caution though - ONLY USE THIN SLICED OR PRE COOKED MEATS ON A BROILED PIZZA. Broiling might not cook meats long enough for them to be safe.
=============
Cooking tips: When making this crust, measure the oil in the tablespoon before you measure the honey.  The oil will leave the spoon slippery and the honey won't stick to the spoon.  Anytime a recipe calls for both oil and honey, I add the oil first.  That way I don't have to fight with the honey.

Also, if the water is too hot it will kill the yeast and cause it not to rise.  If your crust turns out flat and heavy you might have used water that was too hot.  For this recipe, the warm tap water should not be above 120 degrees.  That's warm though for you to touch without burning your fingers.


Monday, November 28, 2011

Cranberry Sundae or Cranberry Parfait


Happy Thanksgiving all!

My favorite part of the entire Thanksgiving meal is the cranberry sauce.  I happen to make it homemade and it's quite delicious if I do say so myself!

I was listening to a foodie-type cooking show on the radio the other day and I heard a GREAT cranberry idea!  The radio host suggested a cranberry sundae.  That would be leftover cranberry sauce drizzled over ice cream.  Sounds DELICIOUS!!!

Well, I don't know about you, but I'm watching my girlish figure.   So I needed to lighten things up.  What I came up with instead is a cranberry, yogurt parfait!


Here are the recipes!

Homemade Cranberry Sauce

1 lb fresh cranberries
1 c. water
1 c. white or brown sugar
1 teaspoon cinnamon
1 15oz can crushed pineapple
The juice and zest of 1 medium sized lemon
pinch of nutmeg, allspice and a pinch of salt

Heat everything over medium heat until the berries are cooked down as much as you like.  I like it all mushy and saucy.  Some people like the berries to me whole.  It's up to you.

After the sauce is cooked, set it aside to cool off a bit.

Cranberry Sundae
Place 1 ginger snap in the bottom of a cup or bowl.  Drizzle cooled cranberry sauce over vanilla ice cream.  Garnish with another ginger snap.


Cranberry Parfait
Layer plain yogurt and cranberry sauce in a cup or bowl.  Garnish with granola.


Tuesday, October 18, 2011

Baking - Apple Tart Tatain


Tart tatain is a super easy fruit tart that can be made with just about any fruit.

Start with recipe with a simple pie crust.  Unfold the crust.  Center the fruit in the middle of the crust.  Fold up the edges of the crust and bake.  SO EASY!!!

Don't feel pressured to make a homemade crust.  You can also make this recipe with a store bought refrigerator crust.  (I like Pillsbury, but use what you like).

Unfold pie crust on a cookie sheet or other flat pan.  Center fruit (sliced fresh apples, drained canned peaches or frozen berries).  Sprinkle berries with 2-3 Tablespoons of sugar.  Fold up the edges of the crust around the fruit.

Bake at 350 degrees until crust is brown and fruit is tender.

That's it!

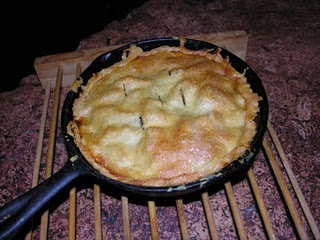
Baking - Skillet Apple Pie


Since it's apple picking time, a LOT of us have loads of apples laying around.  Here is a great use for all of those extra apples.

Skillet Apple Pie

Any kind of apples (sliced)
1/3 c. butter
1/2 c. sugar (brown or white)
2 Tablespoons all purpose flour
1/2 t. cinnamon

Mix sugar, flour and cinnamon in a bowl.  Melt butter in a skillet.  Remove butter from heat.  In the skillet, toss sliced apples in butter until all apples are coated.  Sprinkle apples with sugar mixture.  Toss apples until they are evenly coated with sugar mixture.

Top apples with 1 pie crust.  Cut vents (slits) into the crust. 

Bake at 350 degrees until crust is brown and apples are tender.

Enjoy!
   

Food Processor Pie Crust

Let's face it - I'm lazy.  I really enjoy the easy way out.  This crust to totally the easiest way I know to make a pastry crust.

1 1/2 c. all purpose flour
1/3 c. plus 1 teaspoon of shortening
1/2 t. salt
3 Tablespoons ice water

Assemble your food processor using the cutting blade.  Add flour, shortening and salt to the blender bowl.  Pulse until flour and butter are blended and the mixture looks like crumbs.

Add water while pulsing until mixture looks like large crumbs.  Remove from food processor and gently press crumbs into a ball.  Wrap in plastic and refrigerate for 15 minutes.

Roll out crust and use as desired.

Wednesday, October 12, 2011

All Natural Apple Jelly

It's apple picking time again!

This weekend we went apple picking.  While this was a fun family activity I was feeling a little stressed about the MOUNTAIN of apples that now live on my dining room table.

I ended up making a batch of all natural apple jelly.  It was SUPER easy.  Here's what I did:

Apple Jelly

3 cups of fresh squeezed apple juice
3 cups of sugar

We have a juicer.  So I juiced enough apples to yield 3 cups of apple juice.  Combine juice and sugar.  Heat over medium heat.  Stir until sugar is dissolved.  Boil over medium heat, stirring occasionally, until mixture is reduced by half.  If you have a candy thermometer, it should reach approximately 220 degrees.  When the jelly is thick enough to coat the back of a spoon, it's done. 

It should be the consistency of honey.

You can pour the jelly into lidded jars.  Allow to cool overnight.

If you would like to can the jelly for longer storage, watch this video.


The processing time (the amount of time you boil jarred jelly) is 5 minutes.